
So
often I hear people say: "Oh you're so lucky, you have such talent!"
Well......no......for nearly every skilled activity there's a
background of specific training! Even so called "perfect pitch". I
remember reading about some famous musician -" his parents discovered he
had perfect pitch at the age of three."...now how would you discover
that???It's not something you stumble across your child doing!!! you
must have been testing or training in some way....
Take
drawing: when I was a child, there were one or two in my class who were
(apparentely)_ gifted at drawing...but as I look back I realise that
they spent all their time drawing! You do get better at things if you
practice a lot.....especially if you have a few guidelines.
I
can’t draw “naturally” or “intuitively” ....in fact I can't think of
anything very much (that I would want to write a blog about!) that I can
do without having learned in one way or another.
In my life I’ve only
met one or two people who appeared to be able to “just do it” but even
with them, on further enquiry, it was usually the case that they had
been drawing for years and also had had access to some instruction,
however informal. For most of us, therefore, drawing is a skill that we
can learn in the same way that we learned how to cut quarter square
triangles and half square triangles and decided which we needed for any
given quilt pattern. Like anything else, being able to draw involves a
series of basic steps and a lot of practice. Furthermore, as I’m rapidly
discovering, it requires constant practice to even maintain what little
skill level one can attain!
However, I do think it is very
helpful in any type of visual two dimensional art to be able to draw,
not brilliantly, but adequately i.e. good enough to be able to use one’s
drawing as a guide for making a quilt, or a fiber collage or a textile
work (however you like to call it!).
So, here are some steps and tips I have found helpful from both books and a few drawing lessons:
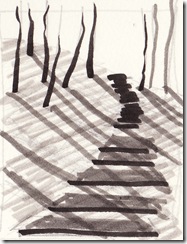 1. What?
The first step is to decide what you are going to draw! What is the
best way of finding your composition? I think it’s helpful to use a
Viewfinder or crop tools. You can actually buy cardboard frames with
clear plastic in divided into 4 or 9…or you can make one – with or
without the plastic..or you can simply cut two L shapes from card. I
find the Ls easier when working from photographs because you can adjust
the frame size. If you are working live, whether outside or in, then a
Viewfinder you can hold with one hand is easier: simply move the frame
(usually a rectangle, but whatever you want the shape of the piece to
be) nearer or further from you. Most of us are used to doing this with a
camera, so we already have helpful experience of this step. Sometimes
I’ll take out my camera and just look through the lens to find an
interesting composition.
2. Beginning.
On a piece
of paper draw in the first four lines: the outside edges, in the same
shape and ratio of sides to top/bottom as your view finder or crop
tools. Then, very faintly, indicate the “horizon” line, the line that is
level with your eyes as you sit or stand. For example if you’re looking
at a sea scene, the level of the sea against the sky is the horizon
line, the end of the street in a street scene and so on.
3. The edge connections.
Then make little marks (dashes or dots!) where the objects within
the scene, whether trees or bottles or kittens, intersect with those
first four lines. This makes sure that you get everything into the
drawing that you have selected in your view finder or crop tools. I know
if I don’t do this I invariably run out of space!! It’s easy to see the
half way mark on the view finder (vf) and the half way mark on the
scene. For example if I like through the vf and see the edge of a roof.
Where does that edge intersect with the frame of the vf? Is it half way
up the left hand side? A quarter of the way from the top? As quilters
we’re used to eyeballing these kinds of distances.
So if the roof
line intersects with the vf on the left hand side, at ¼ of the way down
from its top edge then I make a little mark on my paper at the same
point i.e. 1/4 of the way down from the top edge.
A tip.
Make sure you always hold the vf in the same place by lining it up with
something. I find it easier to spot, for example, a chimney in the top
right hand corner, and a Stop sign in the bottom left hand corner.
Of
course it’s easier working on a flat photograph with the L shapes and
that’s what nearly everyone does!! In that case I usually make a
photocopy of my photograph so that I can draw on it exactly where I
positioned my L shapes.
I actually use this exact same procedure
of looking for half way points, intersection points etc, in cutting out
shapes freehand for a piece when I assemble a quilt.
4. Two dimensions is easier than three.
If you’re working from an actual scene as opposed to a 2-d
photograph, it helps to reduce the 3 dimensional scene to only two. How
d’you do that? By closing one eye. Before you do that, look at an object
in front of you first with just your left, then just with your right
eye. See how the object jumps?? That makes it very difficult to draw,
because your drawing is only in 2 dimensions. So close one eye if you
find that everything keeps jumping around!! Which one to close? Your
less dominant one. Actually I have found it helpful to simply wear an
eye patch than to squint up at the drawing, but most people squint! You
can choose!! As an aside I used to drive down to the pub for lunch
when I was working in Easingwold, UK with a one eyed doctor in an
antique car! It was hair rising, for he had no depth vision, and no
cares!!
5. Look at what you’re drawing.
As you draw, look frequently at the object you are drawing if you
want it to be accurate. Though one teacher (can’t remember if it was
Hans Hoffman, someone of that ilk) – used to make his students look at
an object in one room for 5 minutes, then sprint back to the adjacent
room to actually draw it!! He felt that that improved visual memory!! It
certainly would improve one’s level of exercise!
6. Continuous assessment.
Continually assess whether you have drawn the major lines
correctly…it’s like piecing a traditional quilt, if you get one triangle
in backwards it throws everything off.
7. Elements (line and shape) only.
As you draw the contour lines, don’t think “boat” or “roof” or
“bottle”, think instead “this line goes from ¼ of the way down the left
hand side across to a point about halfway across and 3/4 of t he way
down the rectangle (or square). Just think about lines going from point A
to point B. Like little trails on a map.
Sometimes it’s
easier to think about drawing the negative shapes – i.e. the spaces
behind things, while focusing on them you are less likely to be
distracted by the actuality of the object.
 8. Angles
If the lines are angled, the easiest thing to do is to hold up your
pencil against the view or the photograph and line it up with the
angle…then, holding it carefully in the same position, mark that angle
on the page. If that doesn’t work for you, then you could use a
protractor. I like the nice big ones. Or…when working from a photograph,
you can
line up (i.e. make sure that the verticals and
horizontals on both photo and sketch paper are all exactly vertical and
horizontal!) the photograph adjacent to your sketch paper and put a long
ruler on the angle on the photograph, such that it protrudes beyond and
onto the correct place on the paper. I use this for cutting out correct
angles too. I simply line up the sketch with my fabric and continue the
angle out from my drawing to the cloth. Try it, it works!!
9. Major shapes first.
Get the big shapes and the longest lines in place first. Details are
far less important, don’t even think about them until all the big stuff
is in place!!! No you can’t mess about putting in all those little
windows yet! This is also Very True in designing quilts. And don’t think
about shading or colour yet either!
10. Light and Dark.
Before you start shading, decide where the light is coming from ….if
you’re inside, set up a single light source, if working plein air the
most interesting times to go out and draw are early or late on a sunny
day – because of the nice long shadows! Having shadows creates depth and
adds to the value range. If you take a picture of nearly any quilt,
scan into photoshop and increase the contrast
(Image-adjustments-contrast), it will improve it. Why? Because you
increased the value range. What increases the range? Light!
If you
are working from a photograph, look to see where the darkest darks and
lightest lights are. What was the direction of light in the scene? You
don’t have to necessarily follow this (Rembrandt didn’t always) but it’s
better if you use light and shadow thoughtfully.
It’s easiest to
spot the very darkest values first, so start with those. I think it’s
helpful to have a little value scale (even if it’s just 5 values: light,
med light, med, med dark, dark) drawn out on the side of the paper to
refer to. Do the darkest darks, note where the lightest lights are and
reserve those. I often put a little pencil dot in them so I know “don’t
shade this!”. Then look for the mediums. Do make sure you have a good
range of values. If you look at our very best art quilters you will see
that in all their major works, there is a great range. And remember the
Photoshop experiment!! Push the light values lighter (if you’re using a
pencil simply erase) and the dark values darker.
11.Maturing on the wall.
Finally, when you feel you’ve finished the drawing, pin it up on the
design wall to mature for a few days or weeks…if there’s anything
untoward it will make itself known! Believe me!
So why
should we
bother to learn to draw? Because it is a basic skill that underlies many
art mediums. If you can’t accurately put down in a pencil sketch what
you want to have in your final quilt, then you have no good plan or map
to follow. Without direction, no progress. Just yesterday I read in a
painting magazine about the "Five Pillars" being the foundation of the
Visual Arts: drawing, value, color, edges and composition. So...begin
your journey by sharpening your pencils!
If you have been, thanks for reading! Elizabeth
and I look forward to the comments!!!






 Posts
Posts


