Monday, May 11, 2009

Seeking yet more inspiration!

I’m off again!  This time for a month – and probably beyond the reach of the internet, I’m afraid.  but perhaps that will be a good thing! As my internet Scrabble/Lexolous friend says “addicted– 8 letters” – and I am, I am!  I’m giving a few phone numbers here in this blog – so that all those shows I’m in can call me and tell me I’ve won a prize!!! (wouldn’t that be nice?)  I don’t want to give out phone numbers on my email in case all those people who want to enhance my love life would continue to hound me!  If you do need to reach me, please scroll down to the end and you’ll find the numbers, thank you.

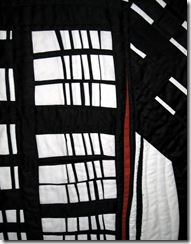
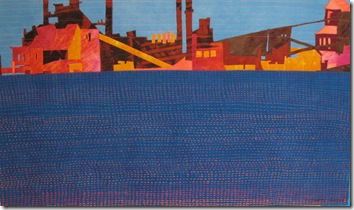
My first concern when travelling is always “what will I take to do?”!!  My pieces are rarely technique driven, but travelling is one time when a lot of handstitching is a good idea!  So I usually have something that requires that technique tickling away at the back of my head….I was playing around on Photoshop with a previous quilt, Rusty Answer, and I realised how much I liked the stitching and how good it would look enlarged, slightly wiggly and quite dense…so that is what I will try!

Tomorrow I fly to the North of England, and I’m going first to the Lake District for a few days.  The Lake District is a glorious part of England – natural lakes and mountains abound…Wordsworth lived there and wrote about daffodils,  Beatrix Potter wrote about rabbits! turner Many painters (notably Turner, Constable and Girtin) have  recorded the gorgeous scenery and often the terrible weather!!! 

Lake Buttermere  (in the Tate collection) Turner.

While recent research (Denis Dutton writes about it in his book The Art Instinct) suggests that most people’s favorite image is that of an open landscape, with water, lots of blue and a few bipeds or quadrupeds,  I doubt I’ll be making a quilt that literally portrays the Lakes.   One of the aims of the artist should be to show beauty where no one noticed it, rather than to make (what is probably doomed to be) a pallid and predictable copy of amazing natural beauty. 
The Lake District boasts the highest mountain in England (Scafell Pike ) which I will view from below, and it’s deepest lake (Wastwater), which I will view from above!

After a 2-3 days in the Lake District, I’m going upto Scotland and will spend a week on the island of Iona.  This is a very famous little island because of its long history.  The earliest remains are from the Stone Age, then in 600 AD a Benedictine abbey was built – now restored -  and the island became a center of Christianity with pilgrims from all over the world.  The monks left a strong legacy of arts and crafts in many mediums.  Many Scottish kings were buried there too.  So there’s all sorts to do and see! And boat trips!!!

rusty answer 300

I love boat trips and have made several quilts that relate to them.  Last year it was a boat trip that started my industrial series.


                                                            Rusty Answer


farneislands

Previously a boat trip out to the Farne Islands led to this piece – one of my all time favorite quilts and the only one I’ve decided not to sell!  Yes! you can have all the rest (well, at least so far…)!.


From Iona, I’m going to Knoydart – this is an extremely remote part of Scotland, no roads, just a pub.  They say you’re very welcome if you can perform in some way!!Yikes! will I need to learn a monologue?  horrors!  I’m just hoping to keep my head down for the week I’m there.

The final week I’m away, an old school friend and I will revisit York and we’re actually going to stay in the school we went to – which was a convent founded in the 16th century.  The old part of the school is now a bed and breakfast establishment, and there we’ll meet up with another old school friend.  Having spent the first half of my life in England, all my oldest friends still live there and it will be wonderful to just take right up again where we left off!

I hope I’ll come back with lots of pictures, inspirations, happy memories and energy!  You never know!
So, this is it for a while – as Tony Hancock fans will remember - “I’m going! I’m going!” 
Please come back to revisit the blog around the 8th or 9th of June –
and, if you have been, thanks for reading!  Elizabeth

Week 1: 011 44 1539 725 894 (this week)
Week 2: 011 44 1681 700 202(next week)
Week 3: 011 44 1687 462 605(week of 24th May)
Week 4: unknown
Sunday, May 10, 2009

Using Photoshop to Design Art Quilts and Wallhangings

I’m not a sophisticated Photoshop (or any other program!) user at all – I’ve only ever taken the occasional 3 hour class – like on how to build a web page – and then had to run home immediately to do it before I forgot! When you are past 40, I’ve found, that if you don’t use it…and rehearse it…it fades very quickly! so first up I’ll say that I use only a fraction of Photoshop’s tools in designing – but I have found those to be very helpful.

I’m hoping to get more ideas on how other fiber artists are using this software…so please write in to the Comments with all your suggestions and possibilities.

I would say I use Photoshop – firstly to help me generate a lot of possible designs, and secondly to help me assess how well the design I’m blocking out on the wall is working.

In generating designs
If you are working from a photograph you’ve taken, Photoshop can be really helpful in simplification.
Most photographs have way too much information, it’s good to Cut out some of the excess! so use the cutout tool to do so.

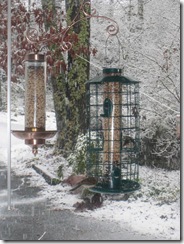
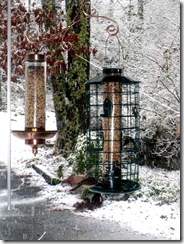
one

Here’s a snap I took through the window in the Great Snow of 2009 (we only have snow about once in 10 years so this was a Real Event!).

To use the cutout tool: Click on Filter, Artistic, Cutout.
the picture will appear on the left (you can adjust the percentage on the bottom left so you can see it all, or just a section). On the right, you are given 3 sliders you can adjust: Number of levels, Edge Simplicity and Edge Fidelity. Basically, number of levels is the number of different values (remember those! – light medium dark etc etc) from one upto 8 that you can choose to have in the picture. Edge Simplicity – refers to little details and marks, the higher the number the simpler you are. The nice thing is you can play with all these sliders and instantly see the effect on your picture – it’s fun!! Edge Fidelity has only 3 levels – again play with it to see how it reduces the complications of the lines in your picture.

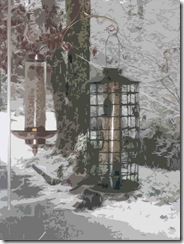
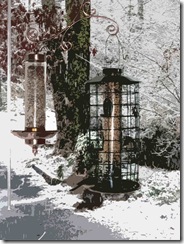
so here are some examples:two

In this one I set Number of levels to 6, Edge Simplicity to 6 and Edge Fidelity to 2.

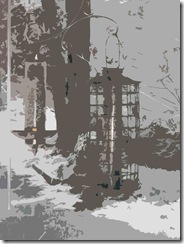
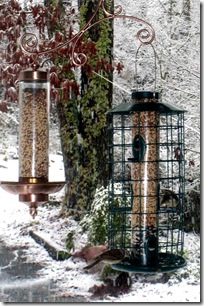
three here: the levels are set at 4,4,2

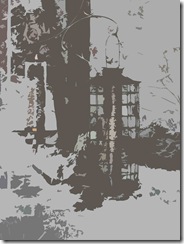
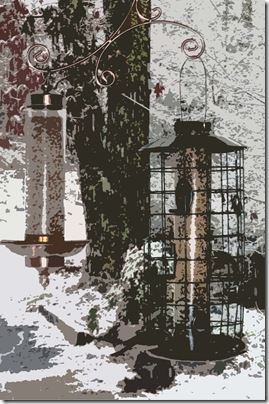
four

And on this one: the levels are 2,2,2

The lovely thing that happens as you reduce the Values and increase the Simplicity is that you begin to lose the edges of the separate objects in the photograph – this gives you a very painterly look and helps you to see the underlying construction which the lines, shapes and values dictate.
One thing that is evident is that there is a lot of weight at the top of the picture, another is that there are light and middle values, but not any real dark ones.

five contrast

so…let’s fix that! Starting with the original image, licked on Image, Adjustments – on the top tool bar. Then you can use Brightness/Contrast to increase (or decrease) the value range in the photograph. so here it is enhanced by about 33 units. Again this is a real fun tool to play with – you can see that more contrast nearly always brings a piece to life – something to remember when choosing fabric!

six con and cut

and having increasing the contrast, now I want to reduce some of the values and some of the details

It’s improving…but I still am bothered by the unequal weight distribution, also I think a clear diagonal underlying construction would make the picture more dynamic – so my third favorite tool is the Quick Mask. This tool located on the vertical toolbar below the overlapping colour panels, can let you see how a piece would look cropped – but without cropping it. It’s a digital version of taking two L-shaped pieces of card and “finding” a composition. Select the area you want to crop, click on Quick Mask and you’ll see a black mask around your selected area. If you like it – unmask and hit Crop on the Image menu! So I cropped out some of the foreground, and that strange meaningless pole on the left (part of the window blinds!): seven con and crop

Here it is Contrasted and Cropped, but now I need to Cut out too:eight

That was a 3/3/2 Cutout, by the way. Now I’ve got a great start to my new Bird Feeder series!!!

And don't forget you can always reduce to black/white/grey with "desaturate" on your Image menu!!! The best way to check the values in your design.

so please have fun with crop, cutout and contrast - to say nothing of desaturate!….and do write and tell me about your favorite Photoshop Tools.
If you have been, thanks for reading! Elizabeth

Friday, May 8, 2009

Process of Making a Quilt

Recently a local journalist suggested he write an article about my quilts (textile art, fiber art, wall hangings etc!)  - he  interviewed me and yesterday a photographer came to take a few pictures.  I’m promised a 6-8 page spread – that’s a lot of pictures!!  He wanted pictures at every stage of the making of a piece – this is even more scattered than I usually work!   so my brain is going in 4,000 different directions.   I think I’m making about 6 pieces at once – as well as reading/listening to 4 or 5 different books, and knitting at least 3 different sweaters, and trying to learn to paint watercolour – don’t even think about the kitchen floor (I don’t!).  I do hope all this activity is actually good for the little grey cells!

When the article is published (Athens Magazine, the June issue, I think), I’ll scan in some of the pictures so you can see what a professional photographer made of it, but for the moment here are my (very) amateur shots of the same steps:

IMG_1300

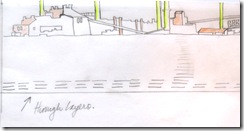
this is the first stage, a lot of little sketches…what I’m thinking about here is the effect of very wide stitching…I’d have to do this by hand..but that will be perfect for my trip to Scotland (coming up soon, more info in a couple of days).  I like the way the stitches look when they pile up into a wiggly line.  I often use a yellow highlighter to indicate where (guess what!) the high lights will be.  I already like the idea that there will be a contrast between horizontal strokes and vertical ones.  But I’ll probably reverse the values across the “water”.  So this idea really came from the what if question of: what if the stitches were bigger….

IMG_1299


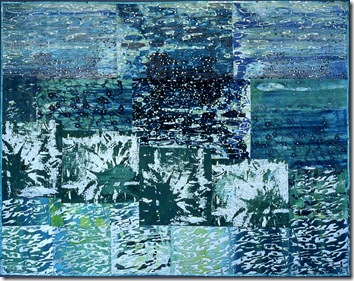
Having got a sketch the next stage is to find (in the stash, see below) or make – the appropriate fabric.  I really enjoyed making Flora and Ferra and have another design sketched out which is similar, but different!! another variation – I love variations (one of my favorite recordings is the original Glenn Gould Goldberg variations, humming and grunts and all).

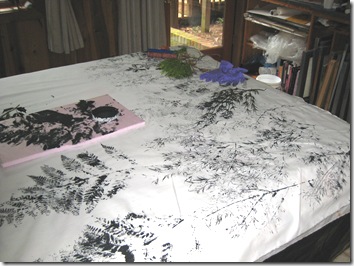
I used up all my “plant” fabric, so must print some more – the photographer got a lot of pictures of me in purple gloves!!  I already have the title for this piece: Plant Life.  Sometimes that happens, a title will create an idea.IMG_1298

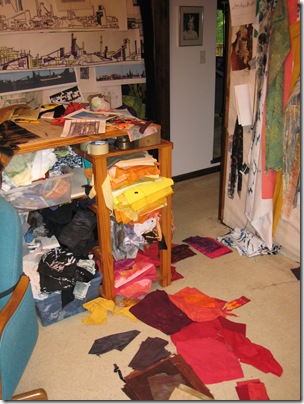
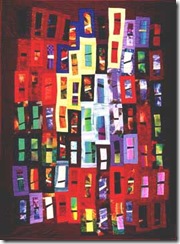
Looking in the stash for fabric!  I knew I wanted to make a version of the Cement Works that was bigger, that used a lot of red, and also gave the sense of the height of those towering containers.  So here I am pulling out all the reds I can find…and I’m Not Allowed to tidy up until the piece is fully blocked out: a) I can’t see the stuff when it’s tucked into the shelving, and b) tidying away is So Much Easier than finding the right fabric, cutting it out and blocking it onto the wall that I would just tidy and tidy and tidy and think I’d achieved something!!!  It’s always easier to do the mindless thing…so that’s something to fight against! Eschew All Displacement Activity!

Every time I “try” a piece of fabric and it “doesn’t work” (usually because I stupidly ignored my own value sketch by the way!) I pin it on the wall next to the piece (you can see there are quite a few hunks now pinned up there!)….in case I want to revisit that possibility later.IMG_1297


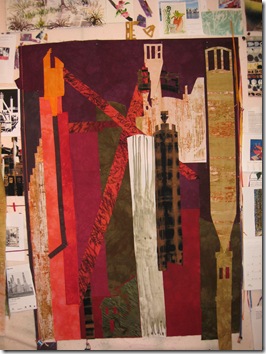
First, I layer a background piece on the wall – and add plumb lines by the way – makes it easier to keep everything straight.  If possible and appropriate, I like the background fabric to reflect the dominant colour – in this case red.  Then I begin to block out the piece…things happen at this stage which can really change the character of the piece…I love the way the Cement works is beginning to take on a medieval castle feeling!!  I’ve still a looooong way to go on this – every piece could be changed…


IMG_1296


Once a piece is blocked out to my satisfaction, I applique all the pieces down onto the background.  I’ve tried various ways of doing this.  Jeanne Williamson (before she went to whole cloth) used a zigzag in invisible thread – she must have a lot more patience than me!!!  I hate that stuff!!  it snaps and twists and curls and disappears only to reappear where you don’t want it!!  plus – why be invisible? what’s wrong with stitching? Of course it’s well known I don’t like f**ing!  so that’s not an option – too flat and gluey!!!  though I don’t mind if others do it – in the privacy of their studios, or under blankets!! (I had a great laugh when a student in a class did just that!  I came back into the workroom and there was somebody working away under a blanket!!!  Great fun, Sue!! I loved it).   I did use a straight stitch on the edge for a long time but after seeing Barbara Watler’s wonderful tree pieces with a tiny zigzag in a closely matching thread I decided that was the most elegant solution.  it takes a little longer but the finish is very nice, and being fairly narrow it’s not as egregiously obvious as the perfect satin stitch some folk do which is a bit too enclosing for me.

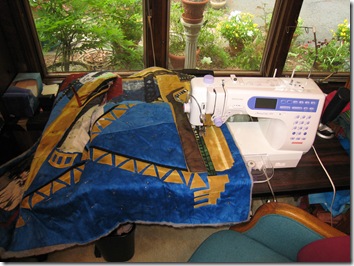
So, once the top is stitched together, it’s layered with batting and backing.  the piece above is in the process of being quilted – this is Cement Works #1, by the way.     I have a sewing machine in my sewing room upstairs (a Janome, as you can see) and another one set up in the basement room – it’s cooler down there in the summer – that’s a Bernina 930.  It doesn’t have the needle up/down feature, but it doesn’t balk at some of the threads I like to use, so each has its advantages.

So I have (at least) 4 pieces on the go!…I don’t think I’ll be quitting quiltmaking any time soon!!!
And if you have been, thanks for reading!
Elizabeth

Wednesday, May 6, 2009

Improvisation: parallels in art, music and comedy.

A friend told me the other that her goal was to become more spontaneous, less controlled in her work and that set me thinking about improvisation. I always thought that sounded like an easy spontaneous thing to do but now I know that’s a myth!! A myth perpetrated because we all like to think that there is a magic easy answer… But there are no princes (or princesses – for that matter I’m sure it isn’t only maidens that kiss frogs!) locked up in our pieces of frog fabric to be released by the magic of a few deft passes at the design wall!

If you study the art of improvisation in any medium, you will quickly learn that there is a basic structure beneath each piece – music, comedy, acting, knitting etc. I once went for a few lessons to a teacher of jazz improvisation (had to give up, the dog howled – well that’s my excuse!) – and was amazed at how much planning went into it. We began with an analysis of the chord structure of the original piece…and then it got really complicated. Given a certain basis, only particular sequences of chord changes would fit…it was like one of those little puzzles where you move the squares around in a frame till they make a picture only you can’t see the images at first. So you have to find the right images, then know the rules of how to move them around.

Musical improvisation has been around for a long time – at least 10 centuries ago sections would be notated as improvisational. However, there were rules, and gradually these became more detailed: e.g. adding in one of several types of trill based on a given chord, or reversing a melody, or changing the timing of a melody, or adding in another melody onto the same chord structure – or changing the time pattern between the right and left hand (e.g. short notes in the left hand plus longer in the right, then vice versa). Interestingly, improvisation in classical music has become much rarer these days.

Improvisation has of course always been central to jazz. But again, structures are often defined: there are specific sequences of the playing of the melody, and then half melodies on different solo instruments followed by the full melody again and other well known patterns. Other “rules: also hold for example: there would only by a limited number of chords one could play to oppose a given dominant 7th, or whatever.

Improvisations by great masters like Charlie Parker have even been transcribed (a nice oxymoron) and are studied for their structure by students of jazz improvisation.

Comedy: When I first saw comedy improv I was amazed at how clever and spontaneous they were – but it’s a mirage!!! The basis of improvisational comedy is a set of structures (like a chord sequence) which are deployed using specific tools.

The structures are usually not that obvious to the admiring, (or rather embarrassed !) audience but if you look – they are there. The training in comedy improv can be quite extensive with tens if not hundreds of possible scenes and situations being practiced. Having been given the “melody” of a situation by some audience member (e.g. a couple celebrating their honeymoon….after an engagement of 8 years!), the very skilled improvisers can decide what structure of a piece they can use to make the most fun!

There are distinct parallels to music and comedy with the improvisational techniques used in art quilts today, or any kind of “collage” art where you are taking pieces of “something” and placing them onto a background surface of some kind and arranging them until they’re “right”. If we do it well and with skill, the melody will sing out and the supporting chords will be in harmony! The result should look spontaneous, but is really the result of skill and knowledge, especially knowledge of structure and harmony – as Kandinsky called it: “regular irregularity”.

affluentdetail2 So is it possible to reach some definition of improvisation in art quilts? Can we define the rules?

The first improvisational quilts came from the African American community and were developed using structures different from Anglo American quilts (which were based on known, published, geometric or botanical patterns). The African American quilts were often based on a structure determined by the shapes of the cloth: i.e. the shapes that remained when you took worn clothing to pieces and cut out the “good bits”. Or the shapes of the scraps that the “white lady” in the big house gave you. Or the shapes that happened when the fabric was cut into rough strips which were then sewn together. One initial rule, therefore, was that of conservation. Beyond that the quilters (in the Gees’ Bend videotape which I saw at the Whitney but cannot find on u-tube unfortunately), talk about balance and interest. One lady stated that “my pattern came from my head” – she had an idea that she was working on. Nobody talked about sewing pieces together spontaneously. In the same way that a musician could not create improvised music by randomly playing notes.

One thing is very evident: begin with a “melody” – a simple design or visual motif (like a square within a square, or a spear shape) – and then create variations upon it. The traditional way to treat a simple design would be to repeat it, perhaps divide it into smaller sections, but retain exactly the initial shapes. In improvisation, the design is not repeated exactly (nwarmlight o 57 repetitions of On Top of Old Smokey!). However, the variations on the theme should relate to it – not two random chords played together, but two related chords. It’s important to make sure that the initial melody is very evident – in jazz this would be at the beginning and the ending of the piece of music – the two most important places. In a visual medium this would probably be in one of the “sweet spots” of the work (i.e. just off centre). Around the melody, the artist arranges the variations in a balanced way, but not so balanced that the piece becomes insistently symmetrical – that would be “against the rules”! If you think about it, it’s a very natural way of composing…as in nature - no two leaves on a tree are alike, but they are clearly all related.

Planning and skill make improv work! Not random spontaneity - as freeing as that may sound!

This is getting too long! But I shall keep thinking about it, especially about possible structures underlying improvisational work – I’d be interested in your comments! What structures have you seen? And whose work is truly improvisational?

And, if you have been thanks for reading! Sorry to be so wordy….blame my friend and her goal!

Elizabeth

Monday, May 4, 2009

How to make the most of an art quilt workshop – or any other!

I’ve taken a lot of workshops in my time and I definitely got more out of some than others. I gradually discovered that there were several steps that would help me to make the most of a workshop - apart from killing off half the other attendees on the first day so as to get more attention! Well, it would get you more attention, I suppose, but not the kind you need!

Pre plan well:

before you even start looking at the goodies on offer, write down what your ideal workshop would be like.

D’you want to learn more new techniques?
D’you want to make sense of those you already know?
Is there a teacher whose work you admire so much you’d really like to get a sense of how s/he thinks?
D’you simply want to have fun with a bunch of friends?
D’you want to visit a certain place? (I’ve never been to coastal Maine and I keep checking Haystack for a workshop I’d like to take!!)
D’you want to be able to work on a piece and have the teacher come by several times a day for discussion and assistance?
D’you have a particular skill or area of knowledge you want to learn? If so, what?
D’you want a class where everyone makes the same thing – and learns a particular specific pattern, or d’you want to learn how to work from your own ideas – a class where everyone is making something different?
D’you want to leave with a completed piece? Or one or more interesting beginnings? (A completed quilt, I found, is unlikely unless the class is working to a specific pattern with limited design choices – and even then I never managed to finish any thing!). I love it if I go home brimming with several different ideas. You decide what is important to you.
What were most/least useful/fun etc workshops you ever took?

It’s difficult to combine some of the above – so know what your priorities are. For example you might wish to know a lot more about a teacher who makes extremely fine technical work, but you know you’re more of a loose person (that’s me!). In which case, write the teacher and ask if you can work at a different pace or level.

Make a short list of possible workshops based on your decisions so far.

elizabeth,arashi

Arashi (tie-dye) workshop

Then read the descriptions carefully AND the supply list – a lot of information can be gleaned from that. Don’t be afraid to email the teacher. I’ve had several pre-class enquiry emails and welcome the chance to clarify what the workshop is about. Often the organizers have limited me to a certain number of words in the class description.

If personal attention is important or you have a special need, please contact the organizers. Find out the size of the workshop and decide whether you like a class with 24 students because of the anonymity and chance to see a lot of other people’s work, or whether you prefer a class of 12-15 where more individual attention is possible. Also if you have a special concern – e.g. allergies to perfume ( as a teacher, I always request that the organizers ask people to avoid wearing perfume) please let the workshop organizers (and the teacher, if appropriate) know.

me sept '06 asilomar

Asilomar: demonstrating use of organza
(yes, the shirt doesn’t go with the quilt!! do take the right wardrobe with you – should definitely match your fabric!)

Travel Plans
If the workshop is some distance away from your home, check the time the class begins and consider arriving the day before. As a teacher I think the students get a lot more out of the class when they’re rested and raring to go instead of being completely worn out with horrible travel experiences. And please don’t party so much the night before the first class and arrive really late and really hung over!!! That’s fine later in the week!! But not on the first day!

The Supply List: make sure you get everything! But if an item doesn’t make sense to you – email the teacher – yes we can make mistakes! But also I’ve noticed that lists may get incorrectly transcribed, or some item has a very different name in a different part of the country. If you’re travelling by air and there’s a heavy item on the list, consider whether someone else might have the item and be willing to share: e.g. an iron. Also substitutes are frequently perfectly acceptable. I remember one class where a teacher specified a certain kind of paper, I had masses of a different kind but went out and bought more of the kind she mentioned – which was of inferior quality. When I got there, I learned what I had would have been just fine – she had been trying to keep the costs down for people with no previous experience.

I try to keep my supply list inexpensive except for the fabric – do take good quality fabric. I’ve seen people pay a thousand for a workshop, then bring cheap and nasty fabric that wouldn’t ever look good in the hope of saving money..there’s something wrong with that!

Also, check to see if there are expensive extra supplies that the teacher will be selling – I would think seriously about this, and decide if this is something you really want to do. I have been in settings where I’ve heard people grumbling about this – forewarned, means you can decide ahead and won’t feel the need to grumble. Or you can take some extra money with you and have fun stocking up!

Be prepared to Listen and Learn different ways of doing things.
This sounds obvious! However, I’ve been in classes where people didn’t even want to try a different way of doing something, and I thought to myself – why not just try? What are you here for? Stay open to new possibilities, see how it goes…then make a decision as to which way works best for you.

Write down your goals for the workshop and your important questions before the first class. As a teacher, the first thing I do is ask everyone what their goals are for the class – I write those down so that I can be sure I give the help and information necessary for the person to reach those goals, maybe not in the workshop itself (depending on their complexity)…but at least to know how to reach them. And so I like students to have their goals and questions ready – I might not be able to answer them all on that first day, but I can be thinking about them – that way we both get more out of the workshop. And I don’t mind in the least if a person is there to have fun and enjoy the atmosphere – that means if I look at her/him and s/he’s smiling, things are going okay!

Please don’t worry that a question might be silly. Honestly I’ve never had a silly question yet – usually at least two others are wondering the same thing. The teacher may not have addressed the point because they never thought of it, that’s doesn’t mean it’s silly!!! So ask away!!!

Actually, while I’m writing about asking questions….I found it was always helpful when I was listening to a teacher to write down my questions in my notebook so that I could phrase them clearly, and note the answer down right away. Also, if I thought of a question (or a comment) while someone else was speaking, I wouldn’t forget it.

Take a notebook – and a camera
In any class there’s going to be a lot of information, especially on the first day. It’s also lovely to look back over notes from several workshops – and see photographs – it helps to recall the knowledge gained, and also some of the fun!

BE open to the possibility of new friendships

100_0964You can meet some really interesting characters in a workshop!


I took a class about 10 years ago at a place I’d never been and was horrified by the “greeting” I was given by people who were the “regulars”. I was told that all the good spots in the room were reserved for the “regular” people, who were of course “more important” - this was true in the dining hall too!! I was rejected from joining groups at several tables before I found the dark corners! And I’d gone there to meet other art quilters!!! It’s good to mix with new people, as well as enjoying the company of old friends. (needless to say I never went back to that particular workshop).

And finally – look after yourself! Nothing is worse for teacher or students if someone has an accident however minor.

But – do have fun! And remember the notebook!

If you have been, thanks for reading! See you in class!

Elizabeth

Saturday, May 2, 2009

Getting ideas

Part 3 – and the last part(!) – of my spring trip to New York.

esb nyc 09 with friends

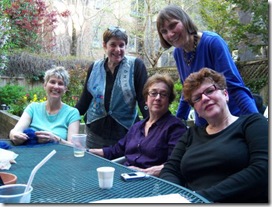
One of the wonderful things about the trip was the ability to discuss fiber and fiber art constantly with good friends – and the occasional glass of wine!   Here we are in the hotel garden  (from left to right: me, Robin Schwalb, Linda Levin, Dominie Nash and Jeanne Butler , picture take by Karen Perrine).   We spent some time discussing 4 shows quite fascinating to a textile artist.

I love black and white work and in the two yearshave made more than a dozen pieces that are mainly black and white.  I want to get even looser and bolder!kwak,sun over door

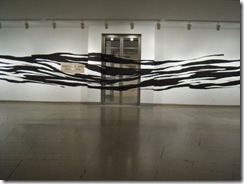
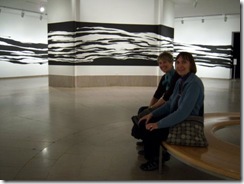
So I was thrilled to see Sun Kwak’s installation at the Brooklyn Museum;  she took black masking tape and installed these strokes and waves around the entire gallery, over the doors, around the pillars, over the cupboards – everything!!  Actually it would have been neat if the guards also had black/white striped uniforms!!

I love the flow of it…you can see her working on the piece on the video below:


kwak,sun esb dn

Above, Dominie and I gazing in wonder and thinking about the possibilities! anyone got a roll of black masking tape?

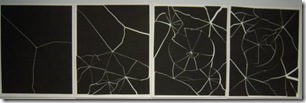
Another “hot” artist is Tara Donovan and she too is working in black and white!  Actually my very very first quilt of all was black and white, I won’t show it here next to these wonderful pieces though.   Tara Donovan is known best for her installations of thousands of identical everyday objects: paper cups, straws, and buttons (we saw amazing coruscating crustaceans of buttons glued together by her very sure hand  at MAD).  However, at Pace Wildenstein gallery is an installation of her new “drawing” work.  

 donavan, tara bdonavan, tara a

donavan, tara c

These are monographs, black ink on white paper.  They are created by shattering the glass after it has been inked and before rolling through the press – only one pass can be made of course.  So each is unique, different patterns come from different types of glass.  Tara Donovan also had some fine delicate pieces made by laying threads on the paper before putting them through the press with black ink.

IMG_0002

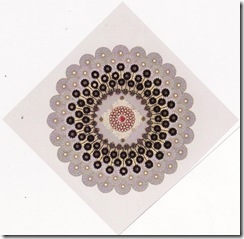
At Pavel Zoubok gallery, we were fascinated by the finely detailed, meticulously and obsessively stitched mandalas of rose petals, buttons, beads, coins, seeds etc made by Donna Sharrett.  She described these pieces as being about memory – each of the items having been donated and containing the memories of the person who gave it to her.  The ends of guitar strings contained the reverberations of the music played.  The show is thus titled Reverb.


IMG_0001

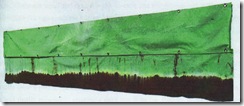
At Pace Wildenstein’s Chelsea gallery we were surprised to see these works.  Canvas, dip dyed in Rit, and hung and joined by means of large grommets.  This  is
Richard Tuttle’s new work.     The pieces are about 2ft high and 10 ft wide.   I really did not see the magic that I loved in his earlier work with a few wires and shadows.  The cloths looked rather lumpy and while the show was entitled “Walking on Air” I felt it never took off at all!    But..I think an art quilter might just be able to build on the idea!

And, if you have been, thanks for reading!   Elizabeth